Friday, January 29, 2010

Dulce de Leche


I've been weighing my desire for homemade dulce de leche vs. a face full of hot sugar and tin can shrapnel. Of course I'm talking about the boil inside the sealed can method, which done wrong (or right) can create a hot sticky bomb in your kitchen. Several brands of sweetened condensed milk specifically warn against doing this.

Of course, I'm thinking: dangerous caramel... yummm.

I was still waffling a bit though, until I saw kitchen koala's approach using a crockpot! It looked so easy that I had to give it a try. No worrying about the water level dropping, no stirring, just turn it on and walk away... far away... just in case.

This method is probably safer than boiling in the can in a pot of water. However, given the way my cans were bulging slightly after six hours I'm going to guess that there is still a small chance of an explosion. So, cook at your own risk.

I had a ton of left over Eagle condensed milk from holiday pie making and Kitchen Koala gave me the perfect use for it. So, I peeled the labels off my cans, placed a piece of foil into my crock pot and placed the cans inside.

Make sure your cans are in good condition, no dents or other imperfections, particularly near the rim. These cans will be under pressure so you don't want to take chances with weak spots.

I filled the crock pot to the lip with warm water, covering the cans completely. Put the lid on and set it on low for 8 hours.


At the end of 8 hours I ladled away most of the water from my pot and then picked up the cans with silicon pot holders. They're still under pressure at this point, so dropping them is a really, really bad idea. So make sure you've got a good grip on the cans before removing them from the pot.

Let the cans cool completely before opening. Until cool, the contents will be under pressure and cracking them open too early is inviting a hot molten caramel bath.

I let mine cool on the counter over night and this is what was waiting for me in the morning...


Oh so good. The irresistible flavor of sugar and danger.

Enjoy, risk takers.

Thursday, January 28, 2010

Saganaki & Why I Never Met Danny Devito


Long ago, in my early university days, I got by working as a server in a Greek restaurant.

Occasionally we had saganaki on the menu as an appetizer special. I appreciated the rarity of the dish, as the combination of hungry diners and leaping flames was always a dangerous mix.

One night when we didn't have saganaki on the menu, I had a customer who I'll call Mr. Important.

Mr. Important was supposedly from California and a "connoisseur" of Greek food. He pulled me aside and told me that he expected VIP service because he and his guests were "very important people" (for reasons I cannot remember). Which is probably one of the dumbest things you can say to a tired, busy server.

So while pouring wine, Mr. Important announces that his party will have saganaki to start. I inform them that we're not offering saganaki tonight. His jaw dropped and he shouted, "You don't have saganaki?! How can you NOT have saganaki?! Danny Devito will NEVER come here if you don't have saganaki!"

It took a few seconds for this to sink in. It just didn't compute. Why would he blurt out such a thing? Moreover, I'm out in the middle of podunk nowhere Washington. The odds of me serving Danny Devito were about as high as my serving a party of leprechauns or Elvis.

Of course, being me, I informed Mr. Important of this, figuring my chances of a decent tip off this party had already long since crashed and burned. Mr. Important then took the matter to our head chef (directly to the kitchen) again invoking Danny Devito. During the height of our dinner rush, no less. Which of course went over marvelously.

Ah, the joys of being a server.

I never saw Mr. Important again and naturally, Danny Devito never stopped by.


All that lengthy blogging stuff aside, saganaki is soooo good. The combination of olive oil, brandy and fresh lemon juice is bliss.

You should make it, because if you don't Danny Devito will NEVER come over to your house for dinner.


This dish is best made with kefalograviera, kasseri, or kefalotyri cheeses. I made it with kasseri (my favorite) earlier but none of the photos turned out. So I made it again today with mozzarella (no more kasseri, sorry!), which is a less expensive, easily obtainable substitution. In fact, feel free to experiment with any number of firm cheeses that can withstand pan frying without melting into a puddle.

Not So Humble Saganaki:
four 3/4" slices of kasseri cheese
3/4 cup all purpose flour
1 egg, beaten
1/4 teaspoon fresh ground pepper
sea salt
olive oil
brandy
1 lemon quartered

warm pita bread

Combine the flour with the pepper and a generous pinch of sea salt. Dip the cheese slices into the egg and then thoroughly coat in flour.

Heat the olive oil in a frying pan until it barely begins to smoke, then add the cheese. Cook until golden brown on each side, turning once.


Place the cheese into a serving dish, pouring a little of the hot olive oil on top. Pour approximately an ounce of brandy over the cheese and ignite. Extinguish with the juice of a lemon wedge. Serve immediately with pita to mop up the delicious mixture of olive oil, brandy and lemon juice.

Wednesday, January 27, 2010

Ms. Humble's First Cake


I was a big fan of playing chef as a young girl. I started out with some very artfully made mud pies and lawn clipping salads... that I forced my younger siblings to taste. Something they are still touchy about. Ms. Humble served us dirt! Ms. Humble told us grass was food! Ms. Humble made us eat cat kibble! Whine, whine, whine.

I'll never live any of it down.

Of course, if I had something like an Easy Bake oven, maybe I would have served brownies or cupcakes! Clearly the fault lies with Mother Humble, since she denied me the easy bake oven, citing some sort of 'fire hazard' nonsense.

Perhaps someday, with enough therapy, I'll get over the grudge I hold against her for denying me the delights of light bulb-baked goodies.

So being the grossly deprived child that I was, I had to make due.

My first cake--one that wasn't made from dirt--was a simple ice box cake. One that is actually good enough to warrant a mention on the blog. It utilizes chocolate whip cream and graham crackers, that's it. You simply layer the graham crackers with generous amounts of the whip cream and allow to chill. After several hours the crackers have absorbed the chocolate cream and have softened, creating a very simple multi layered cake. Kids love it, and this is one dish that they can create all on their own.

As for how it goes over with adults, I forced Mr. Humble to try it (I haven't changed) and though he was skeptical of the cake at first, he ended up eating most of it. Not the portion served, most of the cake. If that isn't a stamp of approval, I don't know what is.


Not So Humble Chocolate Graham Cracker Ice Box Cake:
serves 8
2 packages Graham Crackers
2 1/2 cups heavy whipping cream
1/4 cup granulated sugar
2-3 tablespoons sifted cocoa
splash vanilla

Combine the whipping cream, cocoa, and sugar in a bowl. Chill this mixture for an hour, giving the cocoa time to dissolve.

When ready, add the vanilla and beat your cream to stiff peaks.

Using an offset spatula, spread a layer of cream onto the base of what ever platter you will be using and set two crackers onto it, side by side. Apply a generous dollop of cream and spread it evenly over the crackers, you're aiming for about 1/4". Top with two more crackers and repeat until you've used up all the graham crackers.

Now spread the remaining chocolate whip cream onto the top and sides of the cake. Thats it! So easy even my husband could do it.

Cover the cake in such a way that you don't disturb the cream and place in the refrigerator for at least 4 hours, up to over night. This cake can absorb odors, so if you have a fridge full of onions and cabbage it's best to chill it in an air tight container.

When ready to serve, whip up an additional cup of cream with a tablespoon of sugar and pipe on the decoration. Hopefully you'll be able to pipe evenly, something I had trouble doing today as my daughter was pulling on my skirt, already angling for cake before it was ready.

Go Forth, My Minions!


Well, even if you're not one of my minions, brainwashed by weeks of sugar laden desserts, you should check out Mr. P's Lamington round-up!

It is awesome!

There are so many interesting lamingtons and flavors to be seen! All that baking deserves some serious respect, because honestly, few baking projects are messier than lamingtons. They result in cake crumbs, glaze splatters and coconut everywhere! Of course, you end up coated with the stuff too. After an hour of glazing and coating lamingtons I looked like I had some sort of exotic coconut skin disease.

After 5 days of making lamingtons... well, let's not discuss what happened.

So head over, check out the lamingtons, give Mr. P some love for hosting this contest and of course VOTE

You don't have to vote for me...

Unless of course, you're susceptible to the subliminal message I've hidden here:

Tuesday, January 26, 2010

Quick Cupcake Decorating


I needed a quick batch of cupcakes this weekend. A very, very quick batch of cupcakes. I had roughly an hour to whip up something that had to look respectable. So, I grabbed a box of cake mix (yes, I can do that!), a hunk of fondant and my set of daisy fondant cutters.

The cutters quickly and easily transformed ordinary cupcakes into something really cute!

To make these flowers, you'll need:
Set of three daisy cutters (link)
1/4-1/2lb of rolling fondant.
gel food coloring (optional)
corn starch for dusting
muffin tin or egg carton
bamboo skewer or toothpick
small dish of water

If you desire colored flowers, tint the fondant with a little gel color and knead until uniform.

Dust your work surface with a little corn starch and roll out the fondant about 1/2 cm thick. Cut out sets of your shapes and then, using the toothpick or skewer, press a line into each petal.

Assemble the flowers with a dab of water, stacking them from smallest to largest and then lay them in an egg carton or muffin tin. Adjust the petals a little to give them a more natural look and allow to dry for about 20-30 minutes.

After frosting your cupcakes, simply pick up the flowers and gently press onto each cake.

Thats it! So easy even my husband could do it.


Serve and be prepared to get plenty of oohs and aahs.

Sunday, January 24, 2010

Humble Plans...


Working out the details to go visit Mother Humble in the UK this spring. So I'll be blogging from London for a few weeks. Of course, this probably won't involve much cooking but certainly plenty of eating. (Anyone have recommendations for good eats in and around London?)

I'm also working out the details for a few side trips around the UK...and beyond.

Where? Okay I'll give a few clues:

I'll take my meat with a side of... more meat!

You know, there just isn't enough sheep head on this blog. Don't worry, I'll make every attempt to fix that terrible flaw.


Looks like fun doesn't it!

Can't back out now, Mother Humble!


Edit for Mother Humble:

Oh come on! This looks way better than a strawberry...


We can play, "Guess what part of the sheep's head this nugget comes from!"

Memories are made when a family bonds over offal.

Friday, January 22, 2010

Lemon Mascarpone Macarons


Macarons! Woo!

After almost 2 weeks of fiddling with recipes and methods, I've finally settled on something that works consistently for me.

I made dozens of batches, adjusting the temperatures, the pans and liners. I've had my oven's convection on and the convection off. I tried using my cavernous gas oven vs. my standard electric oven. I've used fresh eggs and I've used egg whites aged at room temperature for 24, 48 and 72 hours. I've used the sucre cuit method and french meringue.

I made a lot of cookies and some really, really big messes.

Macarons couldn't be simpler when it comes to ingredients, but they are maddening to execute well. They are frustrating little cookie divas.

Finally though, after hours of baking I've got the techniques down. I've developed a very familiar relationship with my ingredients and more importantly, my ovens (you should see the burns I am sporting this week). It has paid off though, with several batches of gorgeous macarons. Ones with lovely feet, good bodies and nice non sticky bottoms (I suppose out of context that would sound a little weird).


I had success with both the french meringue method and the sucre cuit, Italian meringue method. And while I love the delicate texture and the tall profile of the french meringue macaron, I absolutely adore the smooth perfect shells obtained with the sucre cuit method. So, I've decided to use the cooked sugar method for my first completed (filled) batch of macarons.

I used La Cuisine de Mercotte's Italian meringue recipe as my starting point when I began experimenting two weeks ago. I've made some adjustments to correct some of my early awkward feet issues. This recipe does work beautifully, near perfect macarons save a few issues I had with my feet (likely due to my execution or perhaps my old pans were not perfectly level). So I began experimented with the recipe's ratios and came up with my own.

Syrup & Tang gives his formula in a scalable ratio and I thought that was rather handy so I'm going to use it here to illustrate the differences. (Also, I highly recommend Syrup & Tang for anyone looking to troubleshoot their macarons)

Scaleable Macaron Ratios:
Almond meal : Confectioners Sugar : Egg White : Sugar

1.50:1.50:1.0:1.85 La Cuisine de Mercotte

1.25:1.25:1.0:1.54 Not so Humble Pie

1.35:1.35:1.0:1.35 Syrup & Tang

A little confusing? Don't worry, I'll post the recipe below.


Not So Humble Macarons (Italian Meringue Method)
150 grams almond meal
150 grams confectioners sugar
120 grams egg whites (room temperature)
185 grams granulated sugar
50 grams water
gel food coloring

You will need 2-3 baking sheets for these (4-6 if you use stacked pans), depending on how closely you pipe them.

I had the most success with good quality aluminum pans. In fact, I went out and bought 6 new half sheet pans just to improve the results of my macarons. I really needed to upgrade and this was the perfect excuse to do so (I'm very happy I did). I double layered the pans, to help insulate the bottoms and I found it worked great. I also used silicon baking mats (though parchment works just as well).

Prep a large pastry bag with a #11 Ateco tip (or a similar medium sized round tip, little under 1cm) and pre-heat your oven to 320-325 degrees (you have an oven thermometer, right?).

You will need a candy thermometer for this method, as it will require bringing the sugar syrup to a precise temperature.

Also, I should note I didn't age the eggs for this batch, though after all my testing, I feel it does give a slight edge to do so.

Weigh out your confectioners sugar and almond meal and give them a whirl for a minute, pulsing in a food processor. Some people sift them together, but I find that the food processor works best. (A few sites also suggested toasting the almond meal in a warm oven to enhance the flavors and help dry it out, but I didn't feel like this gave better results.)

Pour the almond/sugar mixture into a bowl and set aside.

Weigh out 60 grams of egg whites into the bowl of your stand mixer (make sure the whites are yolk free and your mixer's bowl and whisk attachment are very clean and free of any traces of oil). Also measure out 35 grams of granulated sugar into a small bowl and set it near the mixer.

Weigh out another 60 grams of egg whites into a small bowl and set aside.

Weigh out 150 grams of the granulated sugar into a small sauce pan. Add 50 grams of water to the sugar, attach your candy thermometer and place it over medium heat.

(Note: Even in my smallest sauce pan this mixture is only about 1/2 an inch deep, which was/is difficult for my candy thermometer to read accurately (we're talking -50°F!). I had to gently wash the sugar syrup up a little higher (about the 1" mark) on the thermometer using a spoon to get an accurate reading. So, keep that in mind if you have a similar cheap candy thermometer)

Okay, now you're ready to rock and roll.

When the sugar hits 190°F, start beating the egg whites in your mixer on medium low speed until foamy, while keeping a close eye on the sugar syrup. No need to stir the syrup, just let it come to a boil over medium heat (you're aiming for 230°F). Once the eggs are foamy, slowly add the 35g of sugar and beat to soft peaks on medium speed.

When your sugar mixture hits 230°F pull it off the heat, increase the speed of your mixer to medium high, and slowly pour in the syrup. You want to let the mixture trickle down the side of the bowl, so doesn't splatter and get tossed onto the sides of the bowl. You want the sugar in your meringue, not a candy coated bowl.

Now you can relax, the hard part is over. Allow the mixer to beat the meringue for about 5-8 minutes until cool.

While waiting for your meringue to cool, combine the remaining 60g of egg whites with the sugar/almond mixture and mix until well combined. Add any food coloring you wish to use now, aim for a little darker than your goal as it will lighten considerably when the meringue is added.

Once the meringue is ready, add it to the almond/sugar mixture and quickly fold it together. You should fold until it is just barely uniform, using as few strokes as possible. It is very, very important you don't over mix as the batter will thin considerably with each stroke of the spatula. Your batter is perfect when you lift your spatula and a thick ribbon slowly cascades off, back into the bowl. Though I tend to err on the plop/thick ribbon side of things. If that makes any sense... which I'm sure it doesn't.

Now you're ready to fill your piping bag. If the mixture is just right, it will ooze from the tip slowly under its own weight. (If it oozes out quickly, something went horribly wrong and you'll need to start over.)

Pipe 3cm macarons onto your baking sheets, spacing them a few centimeters apart.

Once you complete a full pan, knock it on the counter gently, to bring up any bubbles and quickly pop them with toothpick.

Allow the macarons to rest like this for 15 minutes. (They can sit longer if you want to bake one or two sheets at a time, but will develop slightly thicker shells)

Bake at 320-325°F for 14 minutes.

Almost looks easy, doesn't it...

Once done, remove from the pans using the silicone baking mat and allow to cool completely (about an hour) before attempting to remove them from the mat. If you're having trouble even after an hour, pop the sheet into the freezer for about 5 minutes and they should pop off easily.

Now they are ready to fill.


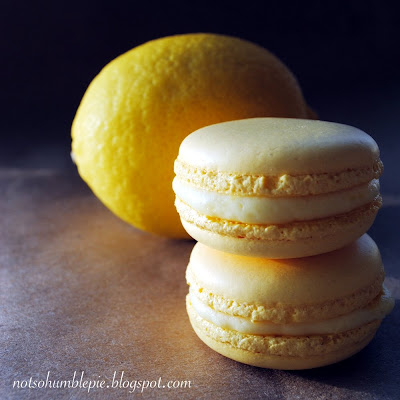
For these, I wanted something a creamy and tart to help offset the sweetness of the shells. I'm in love with this mixture of lemon zest, mascarpone and lemon curd. It is a perfect silky and brightly flavored accompaniment to these little cookies.


Not So Humble Mascarpone Lemon Filling:
275 grams marscapone cheese (chilled)
150-200 grams lemon curd (I used the recipe found: here )
zest of one medium lemon

Mix the ingredients together until smooth; adding more lemon curd to intensify the lemon flavor. Fill a piping bag with the mixture and use to sandwich your macarons.

To store, keep the shells chilled in an air tight container. Bring the macarons to room temperature and then fill before serving.

Enjoy!

The very last bite of the very last macaron.
Matured for 2 days and oh so good.


I love taking photos of these cookies... is it obvious?

Thursday, January 21, 2010

Bitter Sweets


Valentine's Day is coming up! Which means I'll be spending the next few weeks absorbing advertisements that imply my husband doesn't love me if I'm not surprised with over the top flowers, diamonds or a shiny new Lexus.

All us girls know how fun that is!

Of course this also has my husband as nervous as a schizophrenic parakeet on the fourth of July.

He can't win and he knows it.


It's really okay though, since I tend to be unfazed by those traditional displays of affection. I like quirky, I like different... I like bitter conversation heart cookies.

Nothing speaks to my sick sense of humor like a Valentine's day cookie that says "Die in a fire"

Am I weird?

Maybe...


Of course, if I got a box of bitter conversation heart cookies in a new Lexus, well that would be even better.


So, to make these bitter sweets, I took my usual sugar cookie recipe and decorated them with royal icing sayings like: Pre-nup, Daddy issues, Angst, You're No Edward, Don't Call, Table 4 One, Die in a fire, Wanker, Bite Me, Move On and so on...

Good luck keeping your hands steady while laughing.

Disclaimer: Ms. Humble is not responsible for any time spent sleeping on the couch due to poor reaction to Bitter Sweet cookies from your significant other.

Wednesday, January 20, 2010

Crispy Mozzarella Sticks


I've been craving something deep fried and horrible for me. What I wanted was saganaki, but I lacked kefalotyri or kasseri cheeses so that was out of the question (Ooooh! I should do it next week... I need to hit up my resident cheesemonger!). I did however have a big block of mozzarella hanging around so I decided to make do with mozzarella sticks. Of course, as any one who has made them from scratch knows, all that breading is a pain.

So I was thinking about how to satisfy my fried cheese cravings with as little work as possible and I remembered a trip to Utah last year and a Brazilian steakhouse called Rodizio Grill. They had these little appetizers, bites of mozzarella fried in wonton skins. I thought they were a really clever take on the ordinary breaded mozzerella stick and all the more satisfying because they packed a great crunch.

They may not be very chic, but they're good. So I'm going to share these crunchy, easy to make mozzarella sticks. What I am not going to share is how many I managed to eat.

Not So Humble Crispy Mozzarella Sticks:
1 large block mozzarella
1 package egg roll wrappers
1-2 cups marinara (optional)
oil for frying

Cut the mozzarella into 1/2 thick sticks (length will depend on the size of your egg roll wrappers).

Place the mozzarella onto a wonton wrapper and add two tablespoons marinara (if using) and fold in the sides and then roll up. Secure with a dab of water to hold the wrapper closed. Repeat with the remaining cheese.

In a frying pan, heat a half inch of oil over medium/medium-high heat.

Fry the sticks for roughly a minute on each side until golden brown, turning once. Drain on paper towels and serve hot.

Tuesday, January 19, 2010

Dark Chocolate Crème Brulée


Another post dealing with the 'unfortunate' side effect of the ongoing the macaron adventures: orphaned egg yolks.

Despite all the cooking I've been doing, I still have enough yolks in my refrigerator to whip up everything from aioli to zabaglione.

This morning I attempted to make a dent in the yolks by mixing up some créme brulée: Breakfast of Champions (Well, the non-athletic sort). A variation that combines two of my favorite flavors, chocolate and caramel.

When I make créme brulée I prefer to use wide shallow dishes, to give the créme brulée the optimum ratio of burnt sugar to custard. Sure that silky chocolate is good, but I am a sucker for those crisp bits of caramelized sugar. I'm also a sucker for all things involving kitchen blow torches! So I indulge, giving the dish a generous sugar crust.


Fran's Oh So Not Humble Chocolate Créme Brulée:
from Pure Chocolate
serves 6
5 large egg yolks
4 tablespoons granulated sugar (plus more for the burnt sugar topping)
2 cups heavy cream
1/2 vanilla bean, split
4.5 ounces dark chocolate (77% cacao preferred) finely chopped

Preheat your oven to 300°F and assemble six 6" ceramic tarts in a roasting pan.

With a whisk, stir together two tablespoons of sugar with the egg yolks, taking care not to incorporate too much air into the mixture.

Meanwhile, bring the cream, two remaining tablespoons of sugar and vanilla bean to a simmer over medium heat. Once it begins to foam, remove from heat and fish out the vanilla bean. Scrape the vanilla seeds into the cream and discard the pod. Add the chocolate to the mixture and stir until completely melted and smooth.

Pour about 1/2 a cup of the warm chocolate cream into the bowl with the eggs while whisking. Then add the remaining cream and mix well.

For the next step, I find that a medium sized spouted vessel is handy (like a large 4-cup glass measuring cup). Place a fine mesh sieve over the vessel and pour in the custard.

Pour the strained mixture between the six tarts, tapping the roasting pan gently on the counter to settle the custard and remove any air bubbles. Pour hot water into your roasting pan so it comes up roughly as high as the custard and then bake for 20-35 minutes (this will depends largely on how deep your tarts/ramekins are) until set.

Allow to chill (roughly 4 hours) and then sprinkle each with 1-2 tablespoons granulated sugar and torch them until melted. Allow the sugar to set and then serve.

If you don't have a kitchen torch (Why?! Fire GOOD!) you can place them under the broiler to melt the sugar, watching carefully and adjusting the position frequently to help the sugars caramelize evenly.

Sunday, January 17, 2010

Frangelico Dark Chocolate Mousse


Burning through more surplus egg yolks today!

I reached for one of my favorite chocolate theme cookbooks Pure Chocolate: Divine Desserts and Sweets from the Creator of Fran's Chocolates(written by local Seattle chocolate maker Fran Bigelow). This book will be my key to removing the tubs of egg yolks sitting in my refrigerator... it will of course decimate my chocolate supply too, but Fran's recipes are always worth it.


Not so Humble Frangelico Dark Chocolate Mousse:
addapted from Pure Chocolate
serves 8-10
5 large egg yolks
1/2 cup granulated sugar
1/3 cup Frangelico hazelnut liqueur (non-drinkers substitute 1/3 cup water)
8 ounces bittersweet chocolate (preferably 66% cacao), finely chopped
1 cup heavy cream, chilled

In a heat safe bowl, beat the eggs and sugar together until the mixture is uniform and light in color. Place over a double boiler and whisk until slightly thickened. A ribbon of the egg sugar mixture should flow back into the bowl when the whisk is lifted and the sugar should just be beginning to dissolve. Add the Frangelico (or water) and then continue to whisk over the simmering water until the mixture hits roughly 160°F and coats the back of a spoon. Remove from heat and add the finely chopped chocolate. Stir until your arm cramps or the mixture becomes cool to the touch, whichever comes first (roughly 10 minutes).

Set the chocolate aside and beat the heavy cream to soft peaks. Fold the cream into the chocolate, then cover and chill for 4 hours.

Serve in demitasse cups with espresso spoons and a dollop of lightly sweetened whip cream, sprinkled with a little grated dark chocolate.

Or if you're like me... just grab a wooden spoon, scoop up a huge mound of whipped cream and slop it on top. Just overwhelm the little demitasse cup. Oh yes...

Enjoy.

Developing An Unhealthy Obsession


~
So there I am in my kitchen with my bowl of almond flour and meringue and I grab a spatula and start to combine my mixture and it instantly deflates with a dramatic 'poof' and I'm left with a bowl of syrup. Confused, I look at my spatula and it's somehow slathered with butter... oil in my meringue...
~

Then I wake up filled with anxiety over my failure.

Oh come on! Macaron nightmares?! What is that nonsense!

They are just cookies, after all. Little blobs of egg white, sugar and almond flour, hard to get much simpler than that. Yet, they seem to be messing with my head already.

So full disclosure, before last week I had never made a single macaron. In fact, before delving into the food-blog community I had never even understood the significance of the cookie trend. I had even wandered around Paris, ignorantly passing Laduree without a second thought. Of course, within days of really delving into the food blogging community, I understood.


The first thing that pulls you in is their seductive rainbow of colors. Then you begin to understand the attention required to execute the perfect cookie anatomy: the frilly foot, the delicate egg shell like dome. You get a clear sense of the challenge reading the trials of other bakers and the euphoria of their successes.

I thought to myself: "I want that"

I wanted those cookies. I didn't want to eat them--I've always thought macarons were a little too sweet--but I wanted to make perfect macarons.

From then on there was no hope for me. I had the macaron bug.

So I started researching and reading everything I could find online to arm myself before attempting the notoriously temperamental cookie. Then late last week I started separating eggs. Preparing my bowl of egg whites to sit at room temperature on my counter.

My microbiologist husband and I discussed this:

Mr. Humble: Everything grows in eggs. This is not a good idea.

Me: It's basically standard practice. I don't see people keeling over left and right from macarons.

Mr. Humble: Everything grows in eggs! That slurry there can produce a complete chicken!

Me: I like chicken.

Mr. Humble: How about a big bowl of salmonella? Streptococcus faecalis... Escherichia coli?

Me: I knew you'd be like this...

Mr. Humble: Countertop abiogenesis! In three days something is going to crawl out of that ooze.

Me: Yea, and you're going to eat it!

Three days later I made my first batch of macarons.

I don't think I've ever sat in front of my oven and stared through the window the entire time something baked. I was terrified... what if there were no feet. Worse, what if they just turned into a heat-hardened blobs... What if I couldn't do macarons.

I had seen the photos, the failures, the cookies with awkward flat chests, the feet-less lepers, the pools of ooze. I'd have to post them, then everyone would know my shame. Ms. Humble can't make macarons.

Boy, I've never been so happy to see feet. I figured I might have a shot at making decent macarons.

I'll even share my first three attempts with everyone. Feel free to point and laugh! The pink ones are particularly sad.

Virgin attempt: 3 day aged eggs. Sucre-cuit method. Not bad, but not great. Do the feet project a little too much? Regardless the bottoms were a little too sticky. Need to get a better feel for my ovens...


Second attempt: 24 hour aged eggs. Worst yet.

For some reason I thought I could play with an Italian meringue recipe, adjusting the sugar syrup by reducing the amount and replacing it with rose syrup. Bad idea. The macarons were too flat. Tasty, but flat.

Master the basics before you start messing around, duh. The rose syrup might not of been the culprit though, I could have over-mixed these... or it could of been my meringue. This batch lacked the same volume as attempt #1 so I could also lay some blame there. No sticky bottoms this time though.


Third attempt: 24 hour aged eggs. Getting better. No sticky bottoms. Good shell, texture and interior.

My next attempt will be today, with 3 day old eggs. Doing both the sucre-cuit and french meringue method. We'll see how they turn out...

Saturday, January 16, 2010

Mother Humble's Carmel Pecan Sticky Rolls


I'm going to visit my grandfather and run errands today, so I thought I would post one of Mother Humble's recipes to tide folks over.

... and because Mother Humble has been hounding me to post her sticky buns since Christmas. She even provided me with the recipe and her own photos. She must be really proud about winning that dueling potato roll contest.

I believe this dish is commonly called monkey bread, but around here we call just them Mom's sticky rolls. Growing up, it paid to get up early when Mother Humble was making her sticky rolls. The best rolls are always on the outside of the ring, thoroughly coated in syrup and coveted bits of caramelized sugar.

The base uses Mother Humble's potato roll dough, which can be found here: Dueling Potato Rolls. It won't require a full batch of the dough, generally we make rolls for dinner and reserve 1/3-1/2 of the dough for sticky rolls the next morning.

Mother Humble's Caramel Pecan Sticky Rolls:

Caramel Syrup:
3/4 cup butter
3/4 cup brown sugar
cinnamon
pecans

"Combine 3/4 cup of butter melted with 3/4 cup of brown sugar. Stir and boil one minute. (Don't whisk just stir.)

Make potato rolls. Grease a tube pan with non-stick spray. Roll approximately 27 balls of dough, roughly 2 inches in diameter. Place a layer of 9 rolls into the pan. Sprinkle with cinnamon and whole pecans then pour in a third of the caramel syrup. Repeat with 2nd layer of rolls and more cinnamon and caramel syrup. Repeat with 3rd layer. (Can be made without the nuts)."


"Bake at 350 for 25 minutes. When rolls are done, invert onto serving platter and serve warm."

Friday, January 15, 2010

Crema Fritta alla Veneziana

Venetian style fried custard

What to do with a dozen egg yolks left over from macaron prep?

That's what I've been trying to figure out since separating eggs for macarons. (They are aging at room temperature on my counter as we speak, a state that is making my microbiologist husband cringe with discomfort.) Thats right, I'm going to match wits later this week against the infamously temperamental cookie: the macaron. (Cue dramatic music here)

I actually made a batch yesterday and while they came out near perfect, the feet stuck out just a little and for the blog I think I could do better. So I am going to make a few adjustments and try again today or tomorrow as time permits.

So, back to all these egg yolks! I am one of those people who cannot waste even the smallest amount of food. So I must find a good use for all these yolks. There were a few obvious choices: chocolate mousse, crème brulée, custard... all great ways to make use of leftover egg yolks, but I wanted something a little different. Something like the fried custard you can get in Venice during carnival.

These little desserts are creamy, lemony and deep fried. How can you go wrong with that?

My spin gives this dessert a lighter crisper crust, using lemon zest, rice flour, and panko breadcrumbs. Crack the crisp shell and thick warm custard with a hint of lemon oozes out.


Oh so good...

Not so Humble Crema Fritta alla Veneziana:
adapted from Luscious Creamy Desserts
serves 8-10

Custard
6 large egg yolks
1 1/4 cups granulated sugar
1 cup bread flour
4 cups whole milk
5 large strips of lemon zest
3/4 teaspoon pure vanilla extract
pinch salt

Coating
1 cup powdered sugar
1/4 cup rice flour
1/4 cup corn starch
3 eggs
2 cups panko bread crumbs
2 tablespoons finely grated lemon zest

vegetable oil for frying
lemon wedges

Butter a 9" square baking pan and line with a piece of parchment.

In a large heavy-bottomed pot, whisk together the egg yolks and sugar until the mixture has lightened in color and is relatively smooth. Set the whisk aside and grab a wooden spoon, add the bread flour and pinch of salt and mix (it will be very thick). Add a cup of the milk and using the whisk again, mix until smooth. Add the remaining milk and the strips of lemon zest, mixing well.

Set this pot over medium heat and slowly bring it to a boil. This should take roughly 18-20 minutes. Whisking frequently at first and then constantly towards the end. Once the mixture thickens and large bubbles begin to form, remove from heat and strain through a medium mesh sieve. Stir in the vanilla and pour into your prepared pan. Press a sheet of plastic wrap down onto the custard to prevent a skin from forming and then chill for at least 4 hours (ideally overnight).

For frying, heat your oil to 350°F and have a skimmer handy to remove crumbs and keep the oil clean. Heat your oven to 250°F and line a baking sheet with a few layers of paper towels.

You'll need three shallow bowls to assemble the custards for frying. In the first, mix the rice flour, corn starch and powdered sugar. In the second, toss the panko crumbs with the lemon zest and in the third, beat the eggs lightly.

Remove the thoroughly chilled custard from the refrigerator now. Cut around the sides to release the custard and turn out onto a small cutting board lined with a piece of parchment. Peel the piece of parchment off the top of the custard and cut into rectangles (roughly 2x3"). Working in batches so not to over crowd the custards while frying, take 2-4 pieces of custard and place them into the sugar/flour mixture. (Return the remaining custards to the fridge to keep chilled while frying this batch) Coat thoroughly in the flour, then dip into the egg and finally in the panko. Add the custards to the hot oil and fry briefly until golden brown, flipping once. Remove from the oil carefully (they are delicate at this stage) and place on the pan with paper towels and keep warm in the oven.

Repeat with remaining custards until all have been fried.

Serve warm with a dusting of powdered sugar and a slice of lemon.

Related Posts with Thumbnails